Learn the game
How to play Hellbreak
The Quick-Start Rules are out: a free PDF in English, Spanish, and French, packed in the starter set and downloadable from the official rules hub. This is the whole demo game, start to finish, in plain terms.
What follows is the Quick-Start ruleset that ships with the Dracula vs Jaws demo, translated out of rulebook language. Two deeper documents are still listed as coming soon: Learn to Play, which adds full rules and deck-building restrictions, and Master Rules, which adds keyword rulings and timing windows. Where those gaps matter, we say so. Everything else here is playable today.
The goal
You are a monster. Your opponent is a monster. The first player to kill the opposing monster wins, and you kill it by grinding its health stack down to nothing. Everything else is setup for that.
Setup
Each player brings a deck built around one monster, plus one location. The two starter decks are 50 cards each. Setup is the one part of the game that is a checklist rather than a decision, so here it is as one.
- Assign initiative. In the demo the Dracula player starts with the initiative card in front of them. In a normal game you assign it randomly.
- Place your double-sided monster in the center of your play area, Lurking side face up.
- Set your location face up to the right of your monster, its text facing you. The demo fixes these (Dracula plays Carfax Abbey, Jaws plays North Beach); normally each player secretly picks one of two, then both reveal at once.
- Shuffle your deck, put it to your right, and draw four cards.
- Optional mulligan: put any number of cards on the bottom of your deck in any order, then draw back up to four.
- Build your health stack. Take the top eight cards of your deck and deal them face down in a horizontal, overlapping row on your left, starting nearest you.
- Put the Blood, Malice, and Damage tokens where both players can reach them.
Your monster, minions, and assets are each either ready or exhausted at any moment. Ready means available to act; exhausted means it has already been used. Most actions exhaust the card that takes them, and the Refresh Phase readies everything again.
A round has three phases
- Feeding Phase
- Horror Phase
- Refresh Phase
You repeat that sequence until someone is dead. "In initiative order" means the player holding initiative acts first, then the opponent.
1. The Feeding Phase
First, collect resources. Look at your vault, the stack of cards tucked under your monster, and take Blood and Malice from the supply equal to every resource icon along their bottom edges. At the start of the game your only vault card is the monster itself. You also draw cards as your vault dictates. Keep your tokens in a pool in front of you.
Then, bid for initiative. Each player may place one card from hand face down, then both reveal. The higher printed cost wins, and that player decides who takes the initiative token. A tie goes to the player who does not currently hold it. Win or lose, every revealed card slides under your monster as a new vault card with its resource bar showing. That is how your vault, and your buying power, grows.
Bidding is the mechanic new players underrate. The card you bid leaves your hand, but it is not wasted: it becomes a permanent resource. A weak hand is a bidding hand. We take the vault apart on its own page.
2. The Horror Phase
This is the game. In initiative order, players take one action at a time, back and forth, until both players pass in sequence, or one slumbers and the other then passes. Your options on your turn:
- Play a card
- Covered just below.
- Attack with a character
- Your monster or a minion hits an enemy character.
- Scheme with a character
- Exhaust a character for value instead of a fight: chip damage, deck filtering, or Malice toward taking a location.
- Use an Action ability
- Some cards carry an [Action] ability you can trigger. A [Lurking Action] works only while your monster is Lurking side up. Some cost Malice from your pool.
- Slumber
- Take 1 Malice and pass the rest of your actions this phase. Only one player may slumber per round.
- Pass
- Do nothing this turn. You may still act later. The phase ends when both players pass in a row, or when one player has slumbered and the other then passes.
Playing a card
Two gates. First, loyalty: your vault must show aspect icons equal to or greater than the small icons printed under the card cost. Second, cost: pay that many Blood from your pool. Blood tells you whether you can afford a card; loyalty tells you whether your vault has been built in the right direction to cast it. Hellbreak has five aspects: Cursed, Deranged, Feral, Revenant, and Void.
The official loyalty example
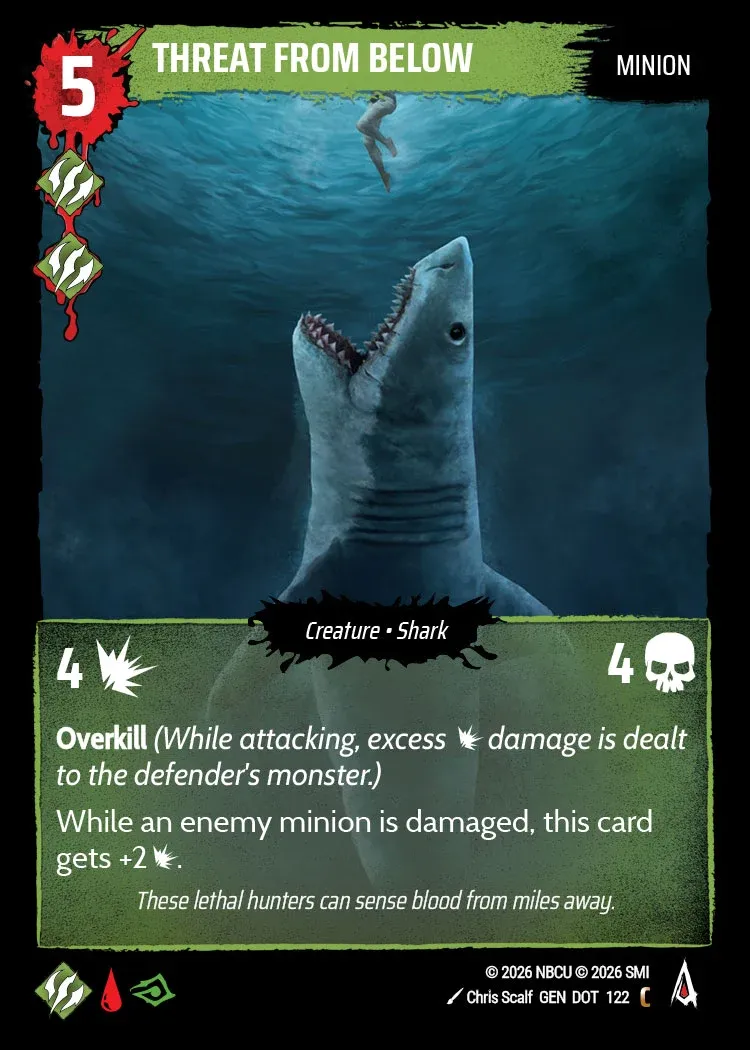
Threat From Below costs 5 Blood and needs 2 Feral loyalty. A Jaws vault showing 2 Feral and 1 Deranged clears the loyalty gate, so the only remaining question is the 5 Blood.
What each type does as you play it: a minion enters one of the two locations exhausted, and you may pay 1 Blood right away to ready it (use any Played or Enters Location ability now). An asset goes to your asset row ready and belongs to no location. An event resolves its text once and goes to your crypt, which is Hellbreak’s name for the discard pile.
Locations, and the word "here"
The board holds two locations, one per player, split by the monsters in the middle. You control the one facing you. A minion is only ever at one location; a monster counts as being at both. If an ability says "here" it reaches only cards at that location. If it does not say "here", it reaches either location.
Attacking
Choose a ready character you control and exhaust it. That is the attacker; use its [Attack] ability if it has one. Then pick the target: an enemy character at the attacker’s location. A monster is in both locations, so it first picks which location to attack through. Your opponent may then exhaust one of their ready characters at that location to defend.
If nobody defends, the attacker deals its Combat value to the target and takes nothing back. If someone defends, attacker and defender deal Combat to each other at the same time. The one exception that shapes the whole game: a monster never takes combat damage on a turn it attacks. Attacking with your monster is close to free; defending with it is not.
Example from the rules: a Giant Octopus with 5 Combat attacks and a 1-Combat character defends. The Octopus deals 5 and the defender dies; the defender deals 1 back, and that damage sticks to the Octopus. Damage does not clear between rounds.
Scheming, and taking locations
Exhaust a ready character to scheme instead of attacking, then resolve its scheme-bar icons left to right, each paired with a number:
- Prowl X
- Deal X indirect damage to your opponent. They divide it across their characters however they like, but no character can take more than its remaining health.
- Foresee X
- Look at the top X cards of your deck, then put them back on top or bottom in any order.
- Haunt X
- Add X Malice to your side of a location. A monster haunts a location of your choice.
When your Malice on a location reaches its control value, you take control immediately: clear all Malice from both sides, rotate the card to face you if it does not already, use its [Take Control] ability if you want, and collect the resource icons printed on it. Locations are a second engine in disguise, feeding your vault without a fight.
3. The Refresh Phase
Three quick steps. Both players ready all their exhausted cards at once. Then, in initiative order, each player may flip their monster, Lurking to Unleashed or back. This is the only window for the flip, and choosing the round to do it is the decision every early write-up of this game circles back to. See Lurking vs Unleashed. Finally, anyone holding more than six cards discards down to six, and a new round starts with Feeding.
Damage, the health stack, and dying
Minion damage is tracked with tokens and is persistent. A minion with damage equal to or above its health is killed and goes face up to its owner’s crypt.
Monster damage hits the health stack instead. A horizontal card there is worth 2 health, a vertical card 1, and there is never more than one vertical card at a time. Damage resolves one point at a time: it turns a horizontal card vertical, or it removes a vertical card (check that card for a [Jumpscare] ability first, use it if you want, then discard it). When the stack is empty, that monster is dead and the game is over.
Deck runs out? You keep playing. Each card you would have drawn from an empty deck instead deals 2 damage to your own monster, which makes decking out its own kind of clock.
A few rules you will hit in the first game
- Allied and enemy
- Allied means you control it. Enemy means your opponent does.
- Unique cards (•)
- A bullet before the name means one copy in play per name. Control a second and you immediately kill one.
- Traits
- Tags like Shark or Vampire in the trait bar. They have no rules of their own; other cards refer to them.
For how to read every number and symbol on a card, see card anatomy. For every term on this site defined in one place, see the glossary.
Still pending, and this page updates when it lands: deck-building rules for constructed play (deck size, copy limits), full keyword rulings, and edge-case timing. Those are Learn to Play and Master Rules territory, both still coming soon with no date.
Keep reading
- Card types explainedMonster, Minion, Asset, Event, Location.
- Aspects explainedCursed, Deranged, Feral, Revenant, Void.
- Vault, Blood, and LoyaltyThe resource system, taken apart.
- Lurking vs UnleashedThe monster flip, and when to use it.
- How to read a Hellbreak cardEvery number and symbol on the frame.
- GlossaryEvery term, defined plainly.